> ## Documentation Index
> Fetch the complete documentation index at: https://docs.irisagent.com/llms.txt
> Use this file to discover all available pages before exploring further.
# Chatbot Automation on Freshchat
> Deploy IrisAgent AI answers to your Freshchat conversations
## **Introduction**
\
IrisAgent AI can answer customer queries right within your Freshchat conversations seamlessly using webhooks. This guide will help you integrate IrisAgent with Freshchat.
## **IrisAgent Portal Configuration**
### **Step 1: Access Freshchat Configuration**
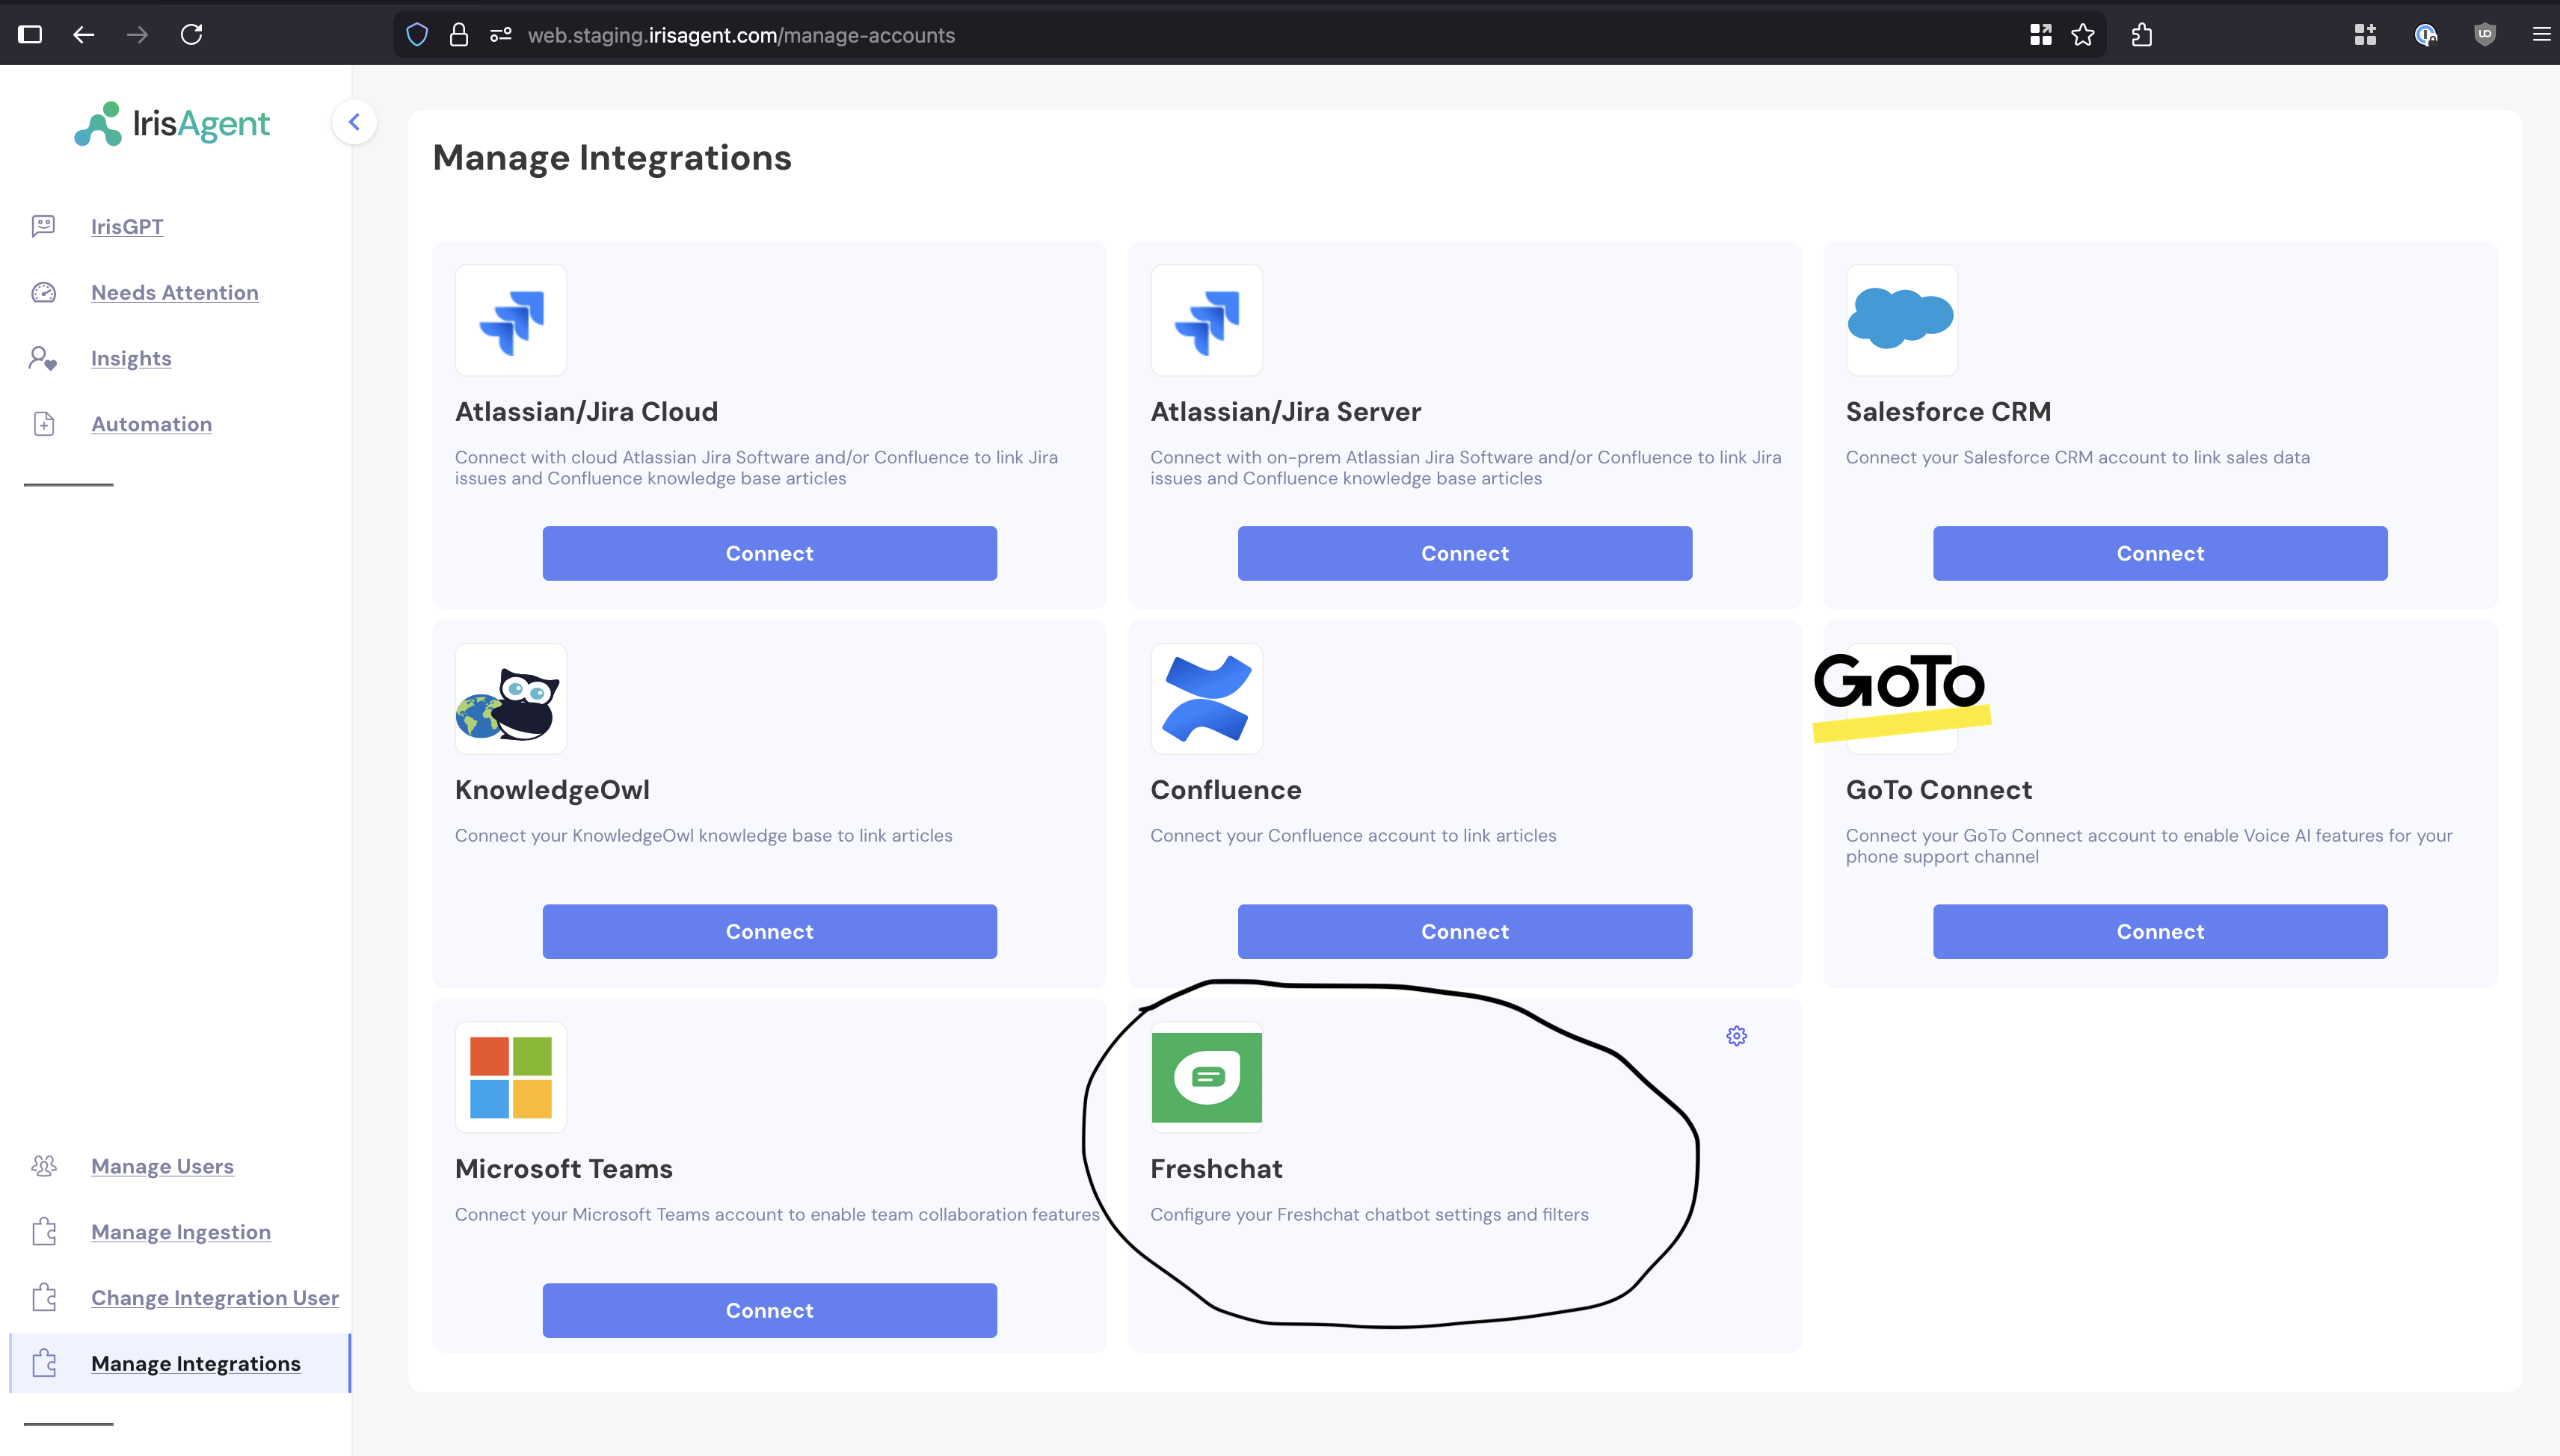
1. In the IrisAgent portal, open **Deploy** > **Chat** from the left sidebar
2. Find the **Freshchat** card and click **Configure** to open the configuration sidebar
3. Toggle **Enable Chat Automation** to ON
 ### **Step 2: Note Your Webhook URL**
\
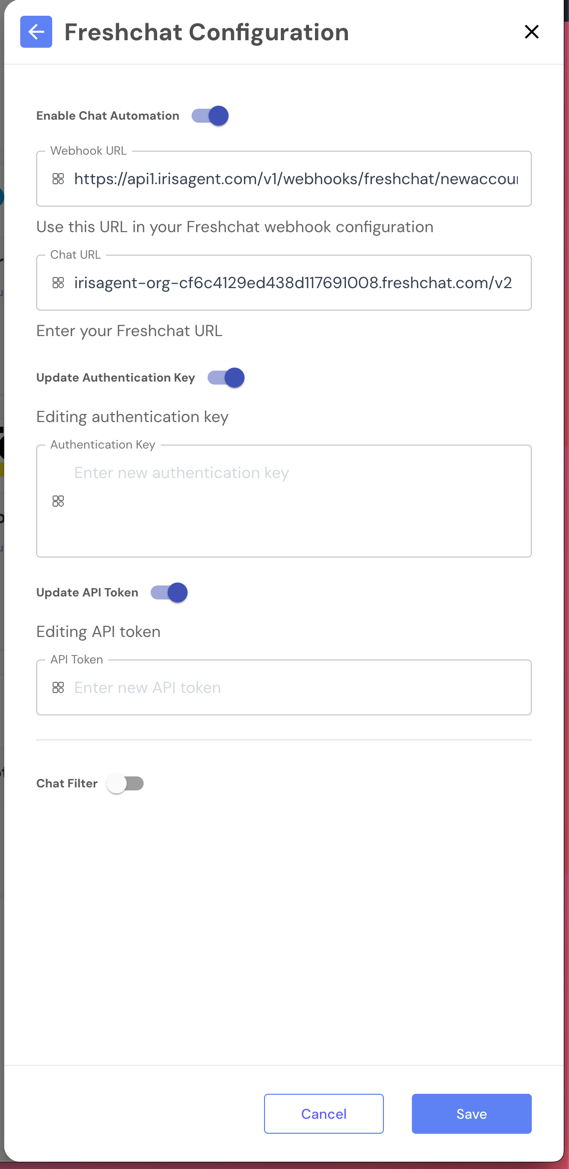
Once enabled, you'll see a **Webhook URL** field that displays your organization-specific endpoint:
```
https://api1.irisagent.com/v1/webhooks/freshchat/{YourOrganizationID}
```
**Important:** Keep this configuration page open - you'll need to copy values from Freshchat and paste them here.
### **Step 2: Note Your Webhook URL**
\
Once enabled, you'll see a **Webhook URL** field that displays your organization-specific endpoint:
```
https://api1.irisagent.com/v1/webhooks/freshchat/{YourOrganizationID}
```
**Important:** Keep this configuration page open - you'll need to copy values from Freshchat and paste them here.
 ### **Step 2a: Configure Event Filtering (Optional)**
\
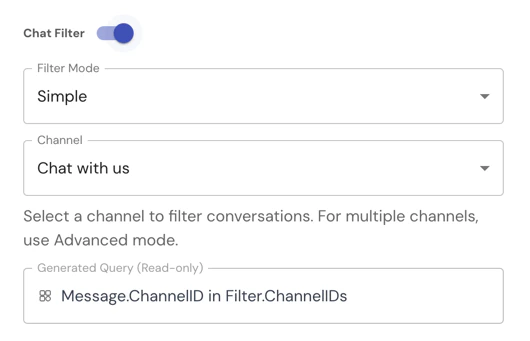
You can optionally enable event filtering to control which Freshchat conversations IrisAgent processes. This allows you to target specific channels or apply custom filtering logic.
#### **Filter Modes**
**Simple Mode:**
1. Toggle **Enable Filter** to ON
2. Select **Simple** mode
3. Choose a **Topic** (Channel) from the dropdown
4. IrisAgent will only process conversations from the selected channel
**Advanced Mode:**
1. Toggle **Enable Filter** to ON
2. Select **Advanced** mode
3. Enter a custom filter query
4. IrisAgent will process only conversations matching your query criteria
**Note:** Filtering is optional. If disabled, IrisAgent will process all incoming conversation events.
### **Step 2a: Configure Event Filtering (Optional)**
\
You can optionally enable event filtering to control which Freshchat conversations IrisAgent processes. This allows you to target specific channels or apply custom filtering logic.
#### **Filter Modes**
**Simple Mode:**
1. Toggle **Enable Filter** to ON
2. Select **Simple** mode
3. Choose a **Topic** (Channel) from the dropdown
4. IrisAgent will only process conversations from the selected channel
**Advanced Mode:**
1. Toggle **Enable Filter** to ON
2. Select **Advanced** mode
3. Enter a custom filter query
4. IrisAgent will process only conversations matching your query criteria
**Note:** Filtering is optional. If disabled, IrisAgent will process all incoming conversation events.
 ## **Freshchat Admin Settings**
### **Step 3: Access Freshchat Admin Settings**
1. Log in to your Freshchat account
2. Navigate to: `https://{YourOrganizationID}.myfreshworks.com/crm/sales/settings`
3. You'll be configuring two sections:
* Conversation Webhooks
* API Settings
### **Step 4: Set Up Conversation Webhook**
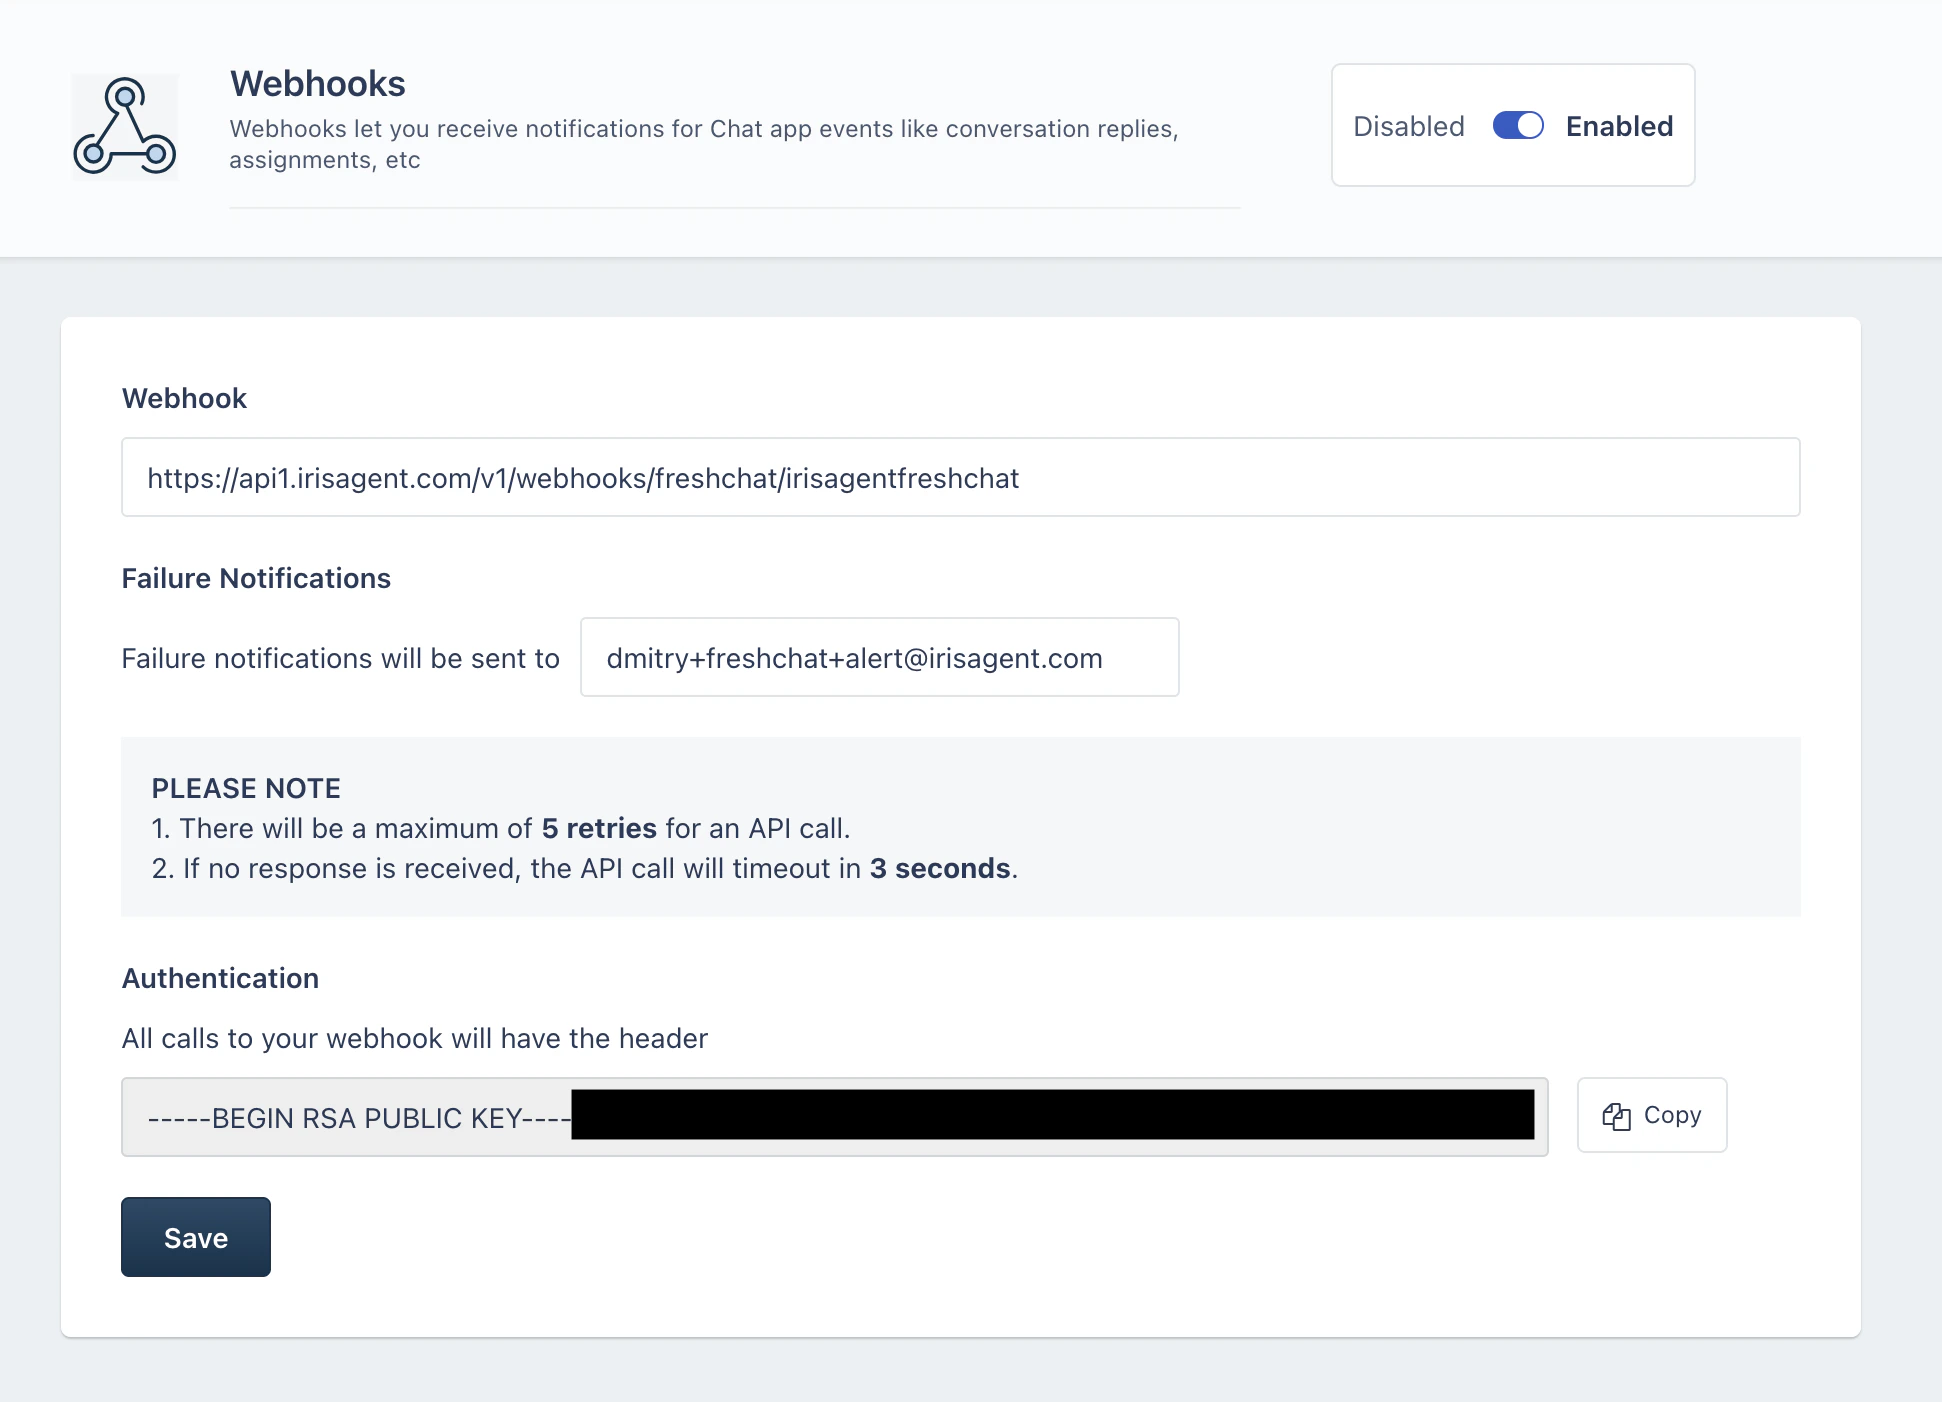
1. In Freshchat Admin Settings, locate **Conversation Webhooks** section
2. Click **Add Webhook** or **Configure**
3. Enter the following details:
* **Webhook URL**: Paste the webhook URL from IrisAgent configuration
```
https://api1.irisagent.com/v1/webhooks/freshchat/{YourOrganizationID}
```
* **Authentication**: You'll enter the RSA Public Key in the next step
4. **Do not save yet** - proceed to Step 5 first
## **Freshchat Admin Settings**
### **Step 3: Access Freshchat Admin Settings**
1. Log in to your Freshchat account
2. Navigate to: `https://{YourOrganizationID}.myfreshworks.com/crm/sales/settings`
3. You'll be configuring two sections:
* Conversation Webhooks
* API Settings
### **Step 4: Set Up Conversation Webhook**
1. In Freshchat Admin Settings, locate **Conversation Webhooks** section
2. Click **Add Webhook** or **Configure**
3. Enter the following details:
* **Webhook URL**: Paste the webhook URL from IrisAgent configuration
```
https://api1.irisagent.com/v1/webhooks/freshchat/{YourOrganizationID}
```
* **Authentication**: You'll enter the RSA Public Key in the next step
4. **Do not save yet** - proceed to Step 5 first
 ### **Step 5: Copy and Configure Authentication Key**
1. Return to the **IrisAgent Freshchat Configuration** page
2. In the **Authentication Key** field, you'll find your RSA Public Key
3. Copy this key
4. Return to Freshchat Webhook configuration
5. Paste the RSA Public Key in the **Authentication** field
6. Click **Save**
7. **Enable** the webhook
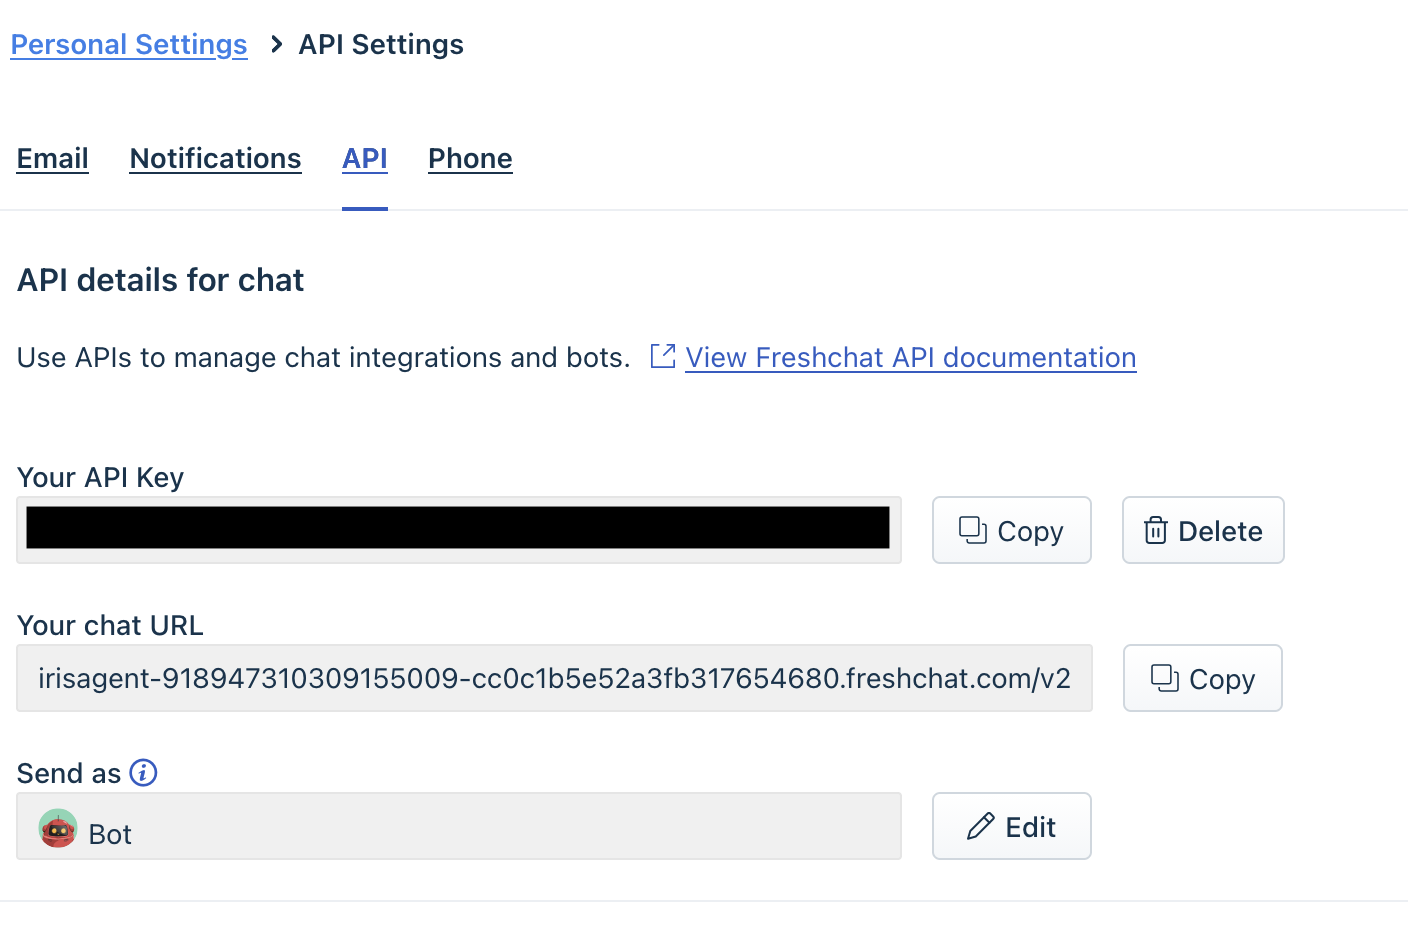
### **Step 6: Retrieve Freshchat API Credentials**
1. In Freshchat Admin Settings, locate **API Settings** section
2. You'll see two important values:
* **Your API Key**
* **Your chat URL**
3. Copy both of these values
### **Step 5: Copy and Configure Authentication Key**
1. Return to the **IrisAgent Freshchat Configuration** page
2. In the **Authentication Key** field, you'll find your RSA Public Key
3. Copy this key
4. Return to Freshchat Webhook configuration
5. Paste the RSA Public Key in the **Authentication** field
6. Click **Save**
7. **Enable** the webhook
### **Step 6: Retrieve Freshchat API Credentials**
1. In Freshchat Admin Settings, locate **API Settings** section
2. You'll see two important values:
* **Your API Key**
* **Your chat URL**
3. Copy both of these values
 ### **Step 7: Enter Freshchat Credentials in IrisAgent**
1. Return to the **IrisAgent Freshchat Configuration** page
2. Enter the following values copied from Freshchat:
* **Chat URL**: Paste "Your chat URL" from Freshchat API Settings
* **API Token**: Paste "Your API Key" from Freshchat API Settings
3. Click **Save**
### **Step 7: Enter Freshchat Credentials in IrisAgent**
1. Return to the **IrisAgent Freshchat Configuration** page
2. Enter the following values copied from Freshchat:
* **Chat URL**: Paste "Your chat URL" from Freshchat API Settings
* **API Token**: Paste "Your API Key" from Freshchat API Settings
3. Click **Save**